Is Your Roof Boot Failing? Here’s What You Need to Know First
Vent boot replacement is one of the most common and cost-effective roof repairs a homeowner can make — and catching it early can save thousands in water damage.
Quick answers:
- What is it? A vent boot is a watertight seal around the plumbing pipes that stick up through your roof.
- When to replace it? When you see ceiling stains, smell sewer gas, or notice cracked rubber around the pipe.
- How much does it cost? Most homeowners pay between $250 and $600, with a national average of around $400.
- DIY or pro? Small repairs can be DIY, but full replacement is best left to a licensed roofer.
- How long do they last? Typically 20–25 years — about as long as the shingles around them.
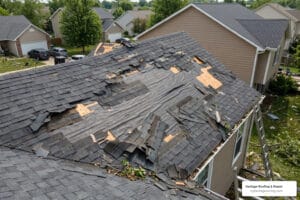
Most homeowners never think about the small rubber-and-metal collar sitting around their plumbing pipes on the roof — until water starts dripping through the ceiling. A failing vent boot is one of the most common sources of isolated roof leaks, and the damage it causes can spread fast: soaked insulation, rotted decking, attic mold. Getting expert roof repair at the first sign of trouble is always cheaper than waiting. To protect your home’s longevity, investing in dependable roofing services is a smart move for any property owner in Northwest Arkansas.
This guide walks you through everything — from spotting the problem to choosing materials to installing a new boot correctly.
I’m Rex Wisdom, owner of Heritage Roofing & Repair, a family-owned business with over 50 years of roofing experience serving Northwest Arkansas — and vent boot replacement is one of the most frequent repairs our crews handle. If you have questions or want a professional set of eyes on your roof, we’re here to help. For homeowners in Northwest Arkansas, addressing these issues promptly with professional roofing services in Fayetteville ensures that small cracks don’t turn into major attic mold problems.

Vent boot replacement terms made easy:
Understanding the Plumbing Vent Boot and Its Purpose

A plumbing vent boot is more than just a piece of plastic or metal; it is a critical intersection between your home’s plumbing and its protective shell. Every time you flush a toilet or run a sink, air must enter the system to keep water moving smoothly. Without these vents, your pipes would gurgle, and wastewater could potentially back up into your home.
The Role of Ventilation in Plumbing
The primary job of the plumbing vent is to regulate air pressure within your pipes. Think of it like a straw: if you put your finger over the top, the liquid stays inside. If you lift your finger, the liquid flows out. Your roof vents act like that “lifted finger,” allowing air into the system so gravity can do its job.
According to scientific research on plumbing ventilation systems, proper venting prevents the “trap seal” from being siphoned out. If that seal breaks, sewer gases—which are both smelly and potentially dangerous—can drift into your living space. The vent boot ensures that while these gases escape, rain and snow stay out.
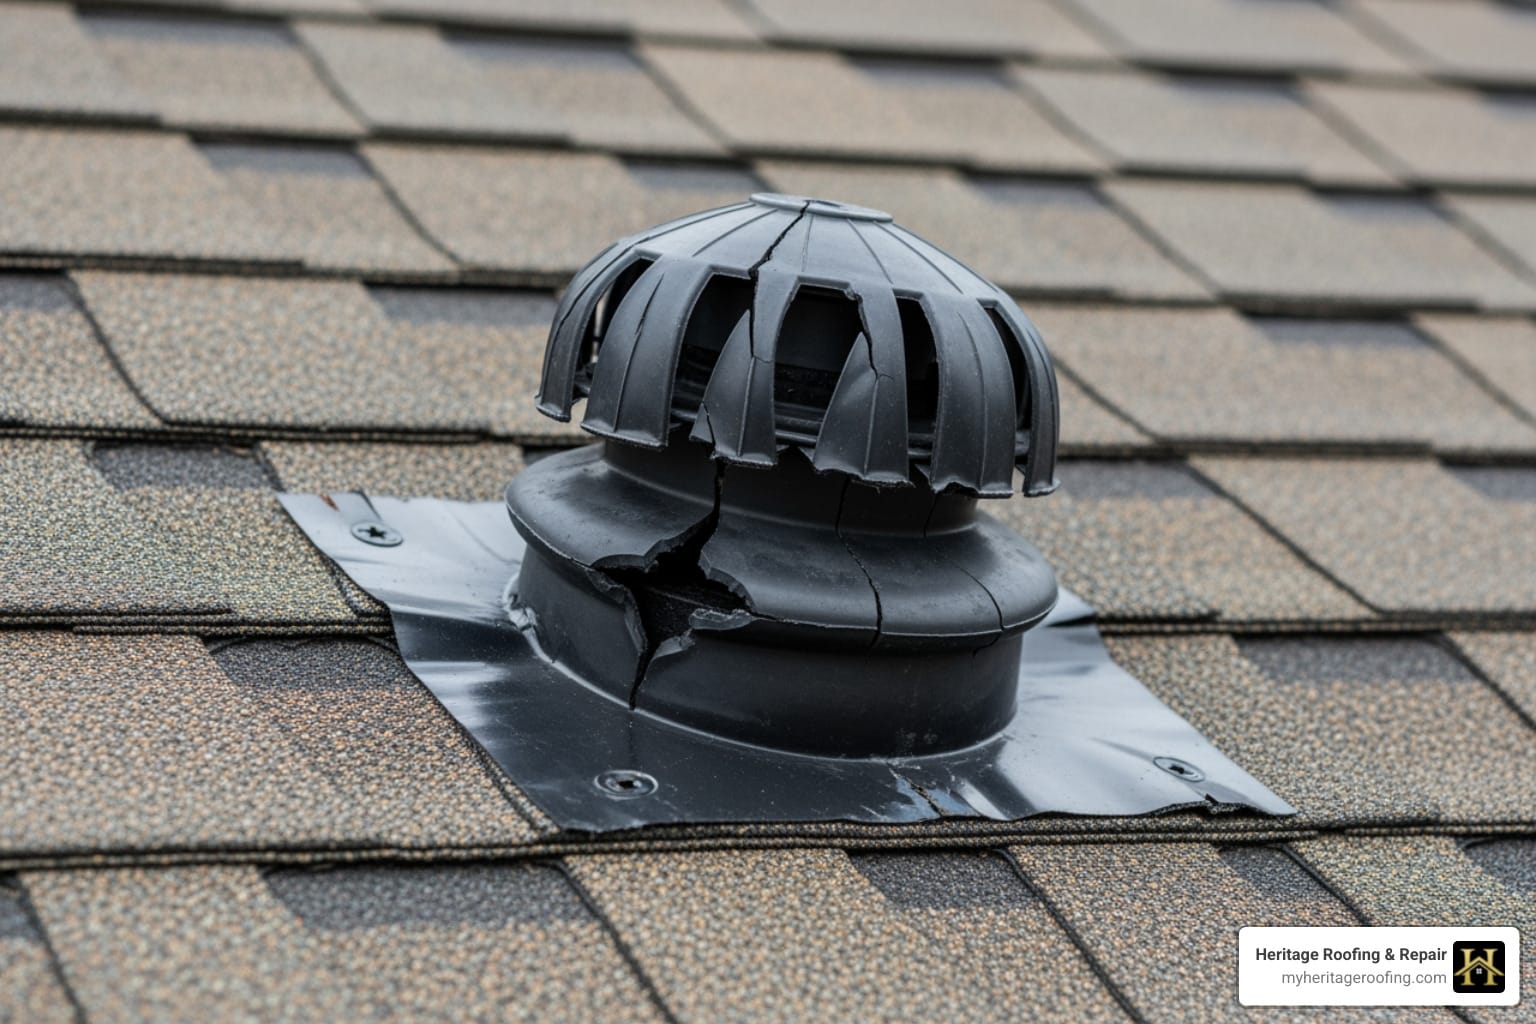
Anatomy of a Vent Boot
A standard vent boot consists of three main parts:
- The Flashing/Base: A flat square of material (plastic, steel, or lead) that sits underneath the shingles above the pipe and over the shingles below it.
- The Collar: A flexible rubber or neoprene seal that hugs the plumbing pipe tightly to prevent water from sliding down the exterior of the pipe.
- The Apron: The lower portion of the flashing that sheds water onto the shingles below.
Because these components are exposed to the intense Arkansas sun and fluctuating temperatures, they experience “thermal expansion.” The pipe and the boot grow and shrink at different rates, which is why the rubber collar is often the first part to fail.
Signs You Need a Vent Boot Replacement
You don’t always need to climb a ladder to know you have a problem. Often, the house will tell you in its own subtle (and sometimes smelly) way. If you suspect an issue, our Roof Leak Repair Guide can help you narrow down the source.
Identifying a Leaking Vent Boot
- Water Spots on the Ceiling: If you notice a brown stain on the ceiling directly below where a plumbing pipe would be located, the boot is the prime suspect.
- Damp Insulation: During a roof inspection, we often find soggy fiberglass or cellulose insulation clustered around the base of a vent pipe in the attic.
- Rusted Nails: Look at the underside of your roof decking in the attic. If you see “shiners” (nails that missed the rafter) covered in rust near the pipe, water is getting in.
- Daylight Through Decking: If you can see a sliver of the sky when looking up at the pipe penetration from inside the attic, your seal is completely gone.
Physical Deterioration Symptoms
If you do head up to the roof, look for these physical red flags:
- UV Degradation: The rubber collar should be flexible. If it looks “alligator-skinned” or feels brittle, it’s past its prime.
- Split Rubber: High winds or simple age can cause the collar to tear. Even a hairline crack can let in gallons of water during a heavy Ozark thunderstorm.
- Rusted Metal Base: For steel boots, rust can eat through the flashing, creating tiny pinholes.
- Animal Damage: Believe it or not, squirrels and raccoons occasionally chew on lead or plastic vent boots.
The Cost of Vent Boot Replacement in 2025
One of the most common questions we get is, “How much is this going to set me back?” The good news is that vent boot replacement is one of the more affordable roof repairs.
On average, a professional vent boot replacement costs about $400. Most homeowners fall into a range between $250 and $600. While the materials themselves are relatively cheap, labor usually accounts for about 90% of the bill—roughly $360 of a $400 job. This is because a roofer must carefully remove surrounding shingles, install the boot, and reseal the area to ensure it’s watertight.
Factors Influencing Vent Boot Replacement Costs
Several variables can nudge the price up or down:
- Roof Pitch: A steep roof requires extra safety equipment and more time, increasing labor costs.
- Accessibility: A three-story home will cost more to service than a single-story ranch.
- Shingle Type: Replacing a boot on a standard asphalt roof is straightforward. If you have clay tiles or slate, the labor cost can climb significantly because those materials are fragile and harder to work around.
- Geographic Location: Costs in Northwest Arkansas are generally more stable than in high-cost coastal metros, but local demand can influence pricing. You can learn more info about roof maintenance costs to help plan your budget.
Material Durability and Price Points
The material you choose impacts both your immediate cost and how long the repair will last:
- Plastic ($10–$25): The most common and affordable option, but also the most susceptible to UV damage.
- Galvanized Steel ($20–$40): More durable than plastic, but can eventually rust.
- Lead ($25–$35): Excellent durability and very easy to mold around the pipe, but some homeowners avoid it for environmental reasons.
- Copper ($30–$50): The “luxury” option. It lasts the longest and is often used on high-end homes with copper gutters or slate roofs.
To get a better idea of local pricing, you can Get Free Quotes on Replacement Costs.
Repair vs. Full Replacement: Making the Right Choice
When a vent boot starts leaking, you have two main options: patch it or replace it. While a patch might seem tempting, we almost always recommend a full vent boot replacement for long-term peace of mind. Our Residential Roof Leak Repair Guide goes into more detail on why permanent fixes are better than temporary ones.
DIY Vent Boot Replacement vs. Professional Repair
Can you do it yourself? Technically, yes. If you are comfortable on a ladder and have basic tools, a DIY replacement can save you a few hundred dollars. However, there are significant risks:
- Safety: Falling from a roof is a leading cause of home improvement injuries.
- Warranty: Many roofing warranties are voided if repairs aren’t performed by a licensed professional.
- Hidden Damage: A pro will check for rotted wood decking under the shingles—something a DIYer might miss, leading to structural issues later.
Innovative Repair Products
If the metal flashing of your boot is in perfect shape and only the rubber collar is split, there are “sleeve” products that can extend the life of the boot without requiring you to tear up shingles.
- Perma-Boot: This is a high-impact plastic cap that slides over the existing pipe and covers the old, cracked rubber collar. It takes about 10 minutes to install and costs around $20. You can find more Perma-Boot product details online.
- Kozy Kollar: This product allows for installation from inside the attic, which is a great safety feature for very steep roofs.
- TPO Flashing Kits: Often used for flat or commercial roofs, these provide a heat-welded seal that is incredibly durable.
Step-by-Step Guide to Proper Installation
If you’ve decided to tackle a full vent boot replacement, follow these steps to ensure a watertight result. Before you start, check our Roof Inspection Checklist to see if other areas of your roof need attention while you’re up there.
Preparing the Roof Surface
- Safety First: Wear a harness and use a sturdy ladder.
- Remove Shingles: Use a pry bar to gently lift the shingles surrounding the old vent boot. You’ll need to remove the nails from the shingles directly above and to the sides of the flashing.
- Clear Debris: Remove the old boot and any old roofing cement or “gunk” from the roof deck.
- Inspect the Wood: If the wood decking is soft or black, it’s rotted. You must replace the wood before installing the new boot.
How to Properly Seal Your New Vent Boot
- Dry Fit: Slide the new boot over the pipe to ensure it sits flat against the roof deck.
- Apply Sealant: Apply a thick bead of high-quality roofing sealant to the underside of the flashing base.
- Position and Nail: Slide the top edge of the flashing under the shingles above the pipe. The bottom edge of the flashing should sit on top of the shingles below the pipe. This creates a “shingle effect” that naturally sheds water.
- Secure: Nail the flashing down using galvanized roofing nails. Keep the nails near the edges so they are covered by the overlapping shingles.
- Seal the Collar: Use a bit of silicone sealant around the top of the rubber collar where it meets the pipe for an extra layer of protection.
For cutting shingles precisely, we recommend you Buy at Amazon Hook Blade Roofing Knife.
Frequently Asked Questions about Vent Boots
How long do roof vent boots typically last?
In the Arkansas climate, you can expect a standard plastic-and-rubber vent boot to last 20–25 years. This conveniently matches the lifespan of a typical asphalt shingle roof. Because of this, we recommend replacing all vent boots whenever you get a full roof replacement.
Does replacing a vent boot increase home value?
While a new vent boot won’t necessarily add thousands to your asking price, a leaking one will definitely show up on a home inspection and could derail a sale. Keeping up with preventative maintenance shows buyers that the home has been well-cared for, increasing buyer confidence.
Can I use caulk to fix a cracked vent boot?
Caulk is a temporary band-aid, not a cure. Because the pipe and the boot expand and contract at different rates, caulk will eventually pull away and leak again—usually within a few months. It’s a great way to stop a leak during a rainstorm, but you should schedule a permanent vent boot replacement as soon as the weather clears.
Conclusion
A small leak around a plumbing vent might seem like a minor nuisance, but it’s a ticking clock for your home’s structure. Maintaining your roof’s penetrations is a critical aspect of homeownership that prevents costly interior repairs. Whether you choose a DIY approach with innovative repair sleeves or hire a professional for a full replacement, addressing vent boot issues early is the best way to extend the life of your roofing system.
For homeowners seeking dependable, affordable, and quality craftsmanship, Heritage Roofing & Repair offers over 50 years of trusted experience in protecting local properties. We specialize in identifying these small “silent killers” of roofs before they become major insurance claims. If you’re worried about your vents, don’t wait for the next big storm. Schedule your professional roof inspection today!
Heritage Roofing & Repair 3458 Arkansas State Hwy 221, Berryville, AR 72616 (870) 654-1164