Why Built-Up Roofing Installation Remains the Gold Standard
Built up roofing installation is a time-tested method that has protected commercial buildings for over a century. This multi-layered system creates an exceptionally durable, waterproof barrier that can last 15-30 years or more with proper care. For business owners in Northwest Arkansas seeking dependable protection for their property, understanding this process is key. As a leading roofing company in Berryville, AR, Heritage Roofing & Repair has specialized in these robust systems for over 50 years, ensuring your investment is secure.
Quick Overview: Built-Up Roofing Installation Process
- Prepare the roof deck – Clean, repair, and ensure proper drainage slope
- Install base sheet – First waterproof layer over the deck
- Apply alternating layers – Hot bitumen and reinforcing felts (3-5 plies total)
- Add flood coat – Final heavy layer of hot bitumen
- Embed surfacing – Gravel or slag for UV and weather protection
Often called “tar and gravel” roofing, BUR systems offer superior waterproofing through their redundant layers. The multiple plies mean that even if one layer fails, others continue protecting your building. This makes built-up roofing ideal for flat or low-slope commercial roofing applications where water resistance is critical.
The installation requires specialized equipment and expertise to heat bitumen to proper temperatures (400-450°F for asphalt) and ensure complete adhesion between layers. Professional installation is essential—improper technique can lead to blisters, poor adhesion, and premature failure. Our deep experience with BUR systems ensures your commercial property gets the reliable, long-lasting protection it deserves.

Understanding Built-Up Roofing: Components and Characteristics

A BUR system’s strength comes from its multiple, redundant layers. Its proven track record, with some roofs lasting over 40 years, is a testament to its robust design. Understanding the core components is the first step toward a successful installation.
The Core Components of a BUR System
At its heart, a built-up roofing system is a marvel of layered engineering, designed to provide exceptional waterproofing and durability. Let’s break down the essential components that make up this robust system:
- Base Sheet: This is the very first layer applied directly over the prepared roof deck. It acts as an initial waterproof barrier and provides a smooth, stable surface for the subsequent layers. Think of it as the foundation of your roof – crucial for everything that comes next.
- Reinforcing Felts (Ply Sheets): These are the “meat” of the BUR system. Made from organic or inorganic fibers (like fiberglass), these felts are saturated or impregnated with bitumen. They provide the system with tensile strength, puncture resistance, and contribute significantly to the multi-layer waterproofing. We typically use three to five layers of these felts, creating a formidable barrier.
- Bitumen (Adhesive): This is the sticky, gooey, yet incredibly effective “glue” that binds all the layers together. Applied hot, bitumen (either asphalt or coal tar) saturates the felts and forms a continuous, seamless membrane, preventing water from penetrating. It’s the waterproofing powerhouse of the system.
- Surfacing Materials: This is the visible top layer of a BUR system, often consisting of gravel, slag, or mineral granules. This layer isn’t just for looks; it provides critical protection from UV radiation, minimizes thermal shock (the expansion and contraction from temperature changes), offers fire resistance, and adds weight to prevent wind uplift. Sometimes, a reflective coating can be applied for improved energy efficiency.
Bitumen Types: Hot Asphalt, Cold Adhesives, and Coal Tar
Bitumen is the lifeblood of a built-up roof, providing the waterproofing and adhesive properties. However, not all bitumen is created equal. The two primary types are asphalt and coal tar, each with distinct characteristics and application methods.
- Asphalt Properties: Asphalt, derived from petroleum, is the most common bitumen used in modern BUR systems. It’s known for its excellent waterproofing capabilities and versatility. Different grades of asphalt (Types I-IV) are selected based on the roof’s slope and the local climate. For instance, higher melt point asphalts (Type III or IV) are used for steeper slopes (up to 3 inches per foot) to prevent slippage. When applied hot, asphalt typically needs to be kept within a temperature range of 400-430°F, with an absolute limit of 450°F, to ensure proper adhesion and prevent degradation. Overheating asphalt can destroy its waterproofing qualities, while underheating leads to poor bonding.
- Coal Tar Properties: Coal tar pitch, a byproduct of coal coking, has been used in BUR for over a century. It’s particularly noted for its unique self-healing properties, meaning it can flow and reseal minor cracks over time, making it excellent for low-slope roofs where water ponding might occur. Coal tar has a lower softening point than asphalt and is typically applied at temperatures between 325-375°F, not exceeding 400°F. While historically popular, coal tar is less common today due to its classification as a potential human carcinogen and the unpleasant fumes it emits during hot application. For these reasons, we generally recommend asphalt-based systems.
- Cold Adhesives: While hot application with kettles is the traditional method, advances in manufacturing have created alternative options, including cold-applied adhesives. These eliminate the need for heating, reducing fumes and fire hazards, and making installation safer and often faster. Cold adhesives are suitable for applications where hot asphalt might be impractical or undesirable. However, they may require specific conditions, like ambient temperatures above 40°F, to ensure proper curing and adhesion.
Regardless of the type, precise temperature control (for hot applications) and continuous, full adhesion between plies are crucial for the integrity and longevity of the built-up membrane.
The Pros and Cons of Built-Up Roofing
Like any roofing system, BUR has its strengths and weaknesses. Understanding these can help you decide if it’s the right choice for your commercial property.
| Advantage | Disadvantage |
|---|---|
| Superior Waterproofing: Multiple layers of bitumen and reinforcing fabrics create a continuous, seamless, and highly effective barrier against water penetration, offering excellent redundancy. | Heavy Weight: BUR systems are inherently heavy, potentially requiring additional structural support for some buildings, which can add to initial costs. |
| Excellent UV Protection: The top layer of aggregate materials (gravel, slag) offers robust UV protection, significantly extending the roofing system’s lifespan by shielding the bitumen layers from sun degradation. | Installation Can Be Slow and Odorous: The traditional hot-applied method involves heating bitumen, which can produce strong, unpleasant odors and fumes. The multi-layer process is also more labor-intensive and time-consuming than single-ply systems. |
| High Fire Resistance: BUR systems can be made with fire-resistant materials, making them a safe choice for buildings in areas with fire risks or strict fire codes. The gravel surfacing also acts as a fire retardant. | Higher Initial Cost: While offering long-term value, the material and labor intensity of BUR installation can result in a higher upfront cost compared to some other flat roofing options. |
| Durability and Longevity: Known for their long lifespan, BUR systems can last for 15 to 30 years, and often well beyond 30 years, with proper installation and maintenance. They are highly resistant to wear and tear, wind, and hail damage. | Potential for Damage in Extreme Cold: While durable, BUR systems, particularly the bitumen, can become somewhat sensitive to extreme cold, potentially reducing their lifespan in very cold climates (e.g., a 15-year lifespan in the Yukon). |
| Withstands Heavy Foot Traffic: Due to their robust, multi-layered construction, BUR roofs can withstand considerable foot traffic, making them ideal for commercial properties that require frequent rooftop access for maintenance or equipment. | Maintenance Requirements: While often cited as low-maintenance, BUR roofs do require regular inspections and prompt repairs of issues like blistering or alligatoring to ensure their longevity. Ponding water can also be a significant issue if not properly addressed. |
The Step-by-Step Built-Up Roofing Installation Process
A proper built up roofing installation is a meticulous process that requires skill and precision. Each step is critical to creating the seamless, waterproof membrane that BUR systems are known for. From deck preparation to the final surfacing, no detail can be overlooked.
Step 1: Preparing the Roof Deck and Substrate

Before any new materials are laid down, the roof deck must be impeccably prepared. This is where the foundation for a long-lasting roof is truly set.
- Cleaning All Debris: First, we thoroughly clean the roof surface, removing all dirt, dust, old roofing materials, and any other debris. A clean surface ensures proper adhesion for the new layers.
- Repairing Any Existing Damage: We carefully inspect the deck for any signs of damage, such as cracks, holes, or rot. Any existing issues must be repaired to create a perfectly sound and smooth substrate. This might involve replacing damaged sections of the deck to ensure a stable base.
- Ensuring the Deck is Completely Dry: Moisture is the enemy of any roofing system, especially BUR. The deck must be completely dry before beginning installation. Trapped moisture can lead to blistering and other issues later on.
- Verifying Proper Slope for Drainage: A common issue with flat roofs is ponding water. We ensure the roof deck has a minimum slope of ¼ inch per foot (or 1:48) to facilitate positive drainage. Slopes of less than ¼ inch per foot are considered undesirable, as they significantly increase the risk of water accumulation, which can accelerate deterioration. For optimal performance, all roof areas must be designed and installed to drain without holding water for more than 24 hours.
Step 2: Layering the Membrane for a Watertight Seal
This is where the “built-up” magic truly happens, as we construct the multi-layered membrane that gives BUR its legendary waterproofing.
- Applying a Base Sheet over the Deck: Once the deck is prepared, we apply a base sheet. This sheet acts as the initial waterproof layer and provides a consistent surface for the subsequent bitumen and felt layers. On nailable decks (like wood), this might be a coated base felt to safeguard against membrane wrinkling from construction moisture.
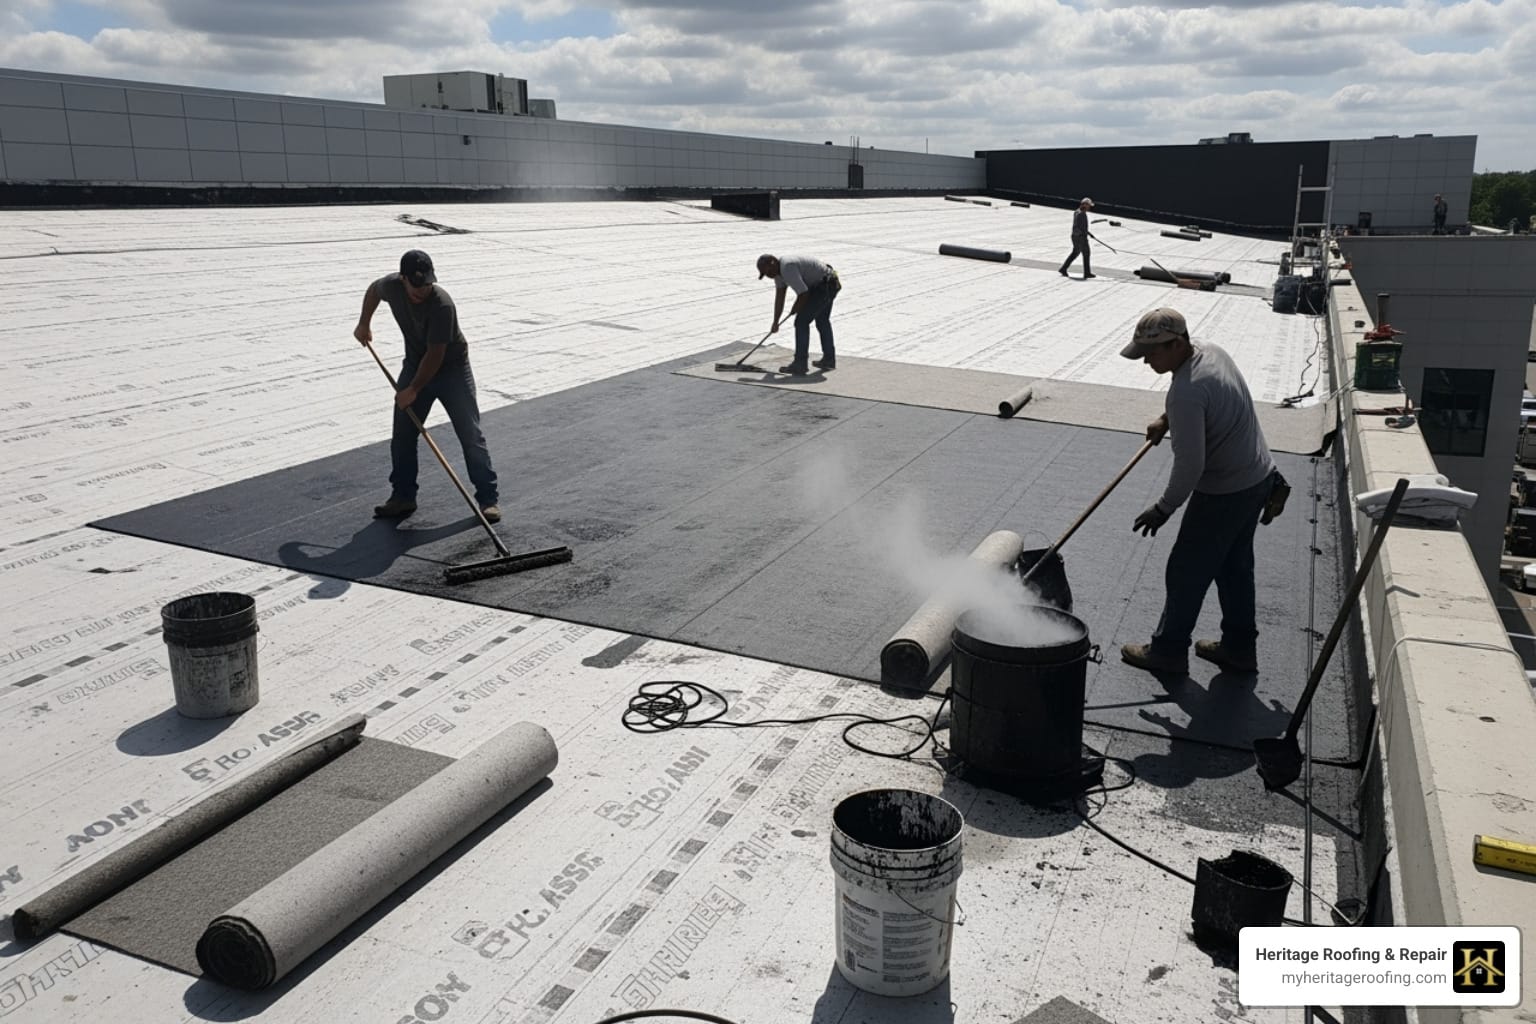
- Alternating Layers of Hot Bitumen and Reinforcing Felts (Ply Sheets): This is the core of the BUR system. We alternate applying layers of hot bitumen (asphalt or coal tar) with reinforcing felts. The bitumen is applied as a continuous, solid mopping, typically at rates of 20-25 pounds per square foot, ensuring a complete bond.
- Typically 3 to 5 Layers Are Applied: The number of layers (or plies) depends on the desired durability, the specific application, and warranty requirements. A standard system often consists of three to five layers, creating a redundant system where multiple barriers protect against water intrusion.
- Ensuring Solid Mopping for Complete Adhesion: Critical to the success of BUR, solid mopping means the bitumen is spread evenly and completely across the felt, with no voids or skips. We ensure the felts are embedded firmly and broomed down without delay to achieve full adhesion. This prevents air pockets that could lead to blistering.
- Avoiding Wrinkles and Blisters: During application, we take great care to lay the felts smoothly, avoiding any creases or folds. Wrinkles can create weak points, while trapped air or moisture can lead to blisters as the roof heats up. Proper adhesion and attention to detail at this stage are paramount.
Step 3: Applying the Protective Surface Layer
The final layer is crucial for protecting the entire system from the elements and extending its lifespan.
- Applying a Final Heavy Flood Coat of Hot Bitumen: Once the desired number of felt plies is installed, we apply a final, heavier flood coat of hot bitumen over the entire surface. This coat serves as the binding agent for the surfacing material.
- Embedding Aggregate Like Gravel or Slag into the Hot Bitumen: Immediately after the flood coat, we embed a layer of aggregate material, typically gravel or slag (sized from ¼ to ⅝ inch), into the hot bitumen. This material must be clean, hard, free of dust, and preferably light in color to reflect sunlight.
- This Top Layer Provides Critical UV Protection, Improves Fire Resistance, and Protects the Membrane from Weather and Foot Traffic: The aggregate surfacing is more than just an aesthetic choice. It acts as a shield, limiting the destructive action of solar rays on the bitumen, minimizing thermal movement, and adding weight to prevent wind uplift. It also significantly improves fire resistance and provides a durable surface that can withstand foot traffic. This traditional “tar and gravel” finish has been a cornerstone of composition roofing for decades, proving its effectiveness. Sometimes, a double pour top coating is desirable on lower pitched roofs for improved protection against ponding water.
Maximizing Your Investment: BUR Lifespan, Maintenance, and Common Issues
With professional installation and proper care, a BUR roof can last from 15 to 30 years, and sometimes even longer. However, its longevity depends on several factors, including climate, the quality of the installation, and a commitment to routine maintenance.
How Long Does a BUR Roof Last?
The lifespan of a built-up roofing system is a testament to its enduring design, but it’s not set in stone.
- Typical Lifespan: 15-30 Years: With proper care and professional installation, a BUR roof can reliably last for 15 to 30 years. In fact, many can last well beyond 30 years. This makes them a trusted choice for commercial properties due to their exceptional durability and long lifespan.
- Factors Influencing Longevity: Several elements play a crucial role in how long your BUR roof will serve you. These include the quality of materials used (more layers and higher-grade materials generally mean a longer life), the expertise of the built up roofing installation team, and the climate your building is in. The combined attack of water or ice and sunshine on the membrane can accelerate deterioration, highlighting the importance of proper drainage and surfacing.
- Climate Impact (Cold Weather Can Reduce Lifespan): While BUR systems are generally robust, they can be somewhat sensitive to extreme cold. For instance, a BUR roof in a very cold climate might last closer to 15 years, whereas in more temperate zones, it could reach 40 years or more. This is because extreme temperature fluctuations can stress the materials.
- Importance of Professional Installation: This cannot be overstated. A BUR roof’s longevity is profoundly affected by the quality of its installation. Professional installers ensure correct material application, proper adhesion, and adherence to manufacturer guidelines, which is crucial for maximizing lifespan and warranty validity.
Common BUR Problems and How to Spot Them
Even the most durable BUR roofs can develop issues over time. Recognizing these common problems early can save you from costly repairs down the line.
- Alligatoring (Cracking):

This distinctive pattern of interconnected cracks resembles alligator skin. It occurs when the bitumen loses its elasticity due to prolonged UV exposure and weathering, causing it to dry out and shrink. While often a sign of aging, severe alligatoring can indicate a need for a protective coating or repair to prevent water intrusion.
- Blistering: These are bubbles or raised areas on the roof surface. Blistering is typically caused by trapped moisture or air between the layers of the membrane during installation. As the sun heats the roof, this trapped material expands, pushing up the bitumen and felt. Minor blisters might not be a huge concern, but larger, broken blisters can lead to leaks. Repairing a blister often involves cutting it open, releasing the trapped gas, and patching it with roofing cement and new felt.
- Ridges and Wrinkles: These are linear raised areas on the roof surface. Ridges can form due to movement in the underlying roof deck, insulation, or from moisture trapped within the system. Wrinkles are often a result of improper installation where felts were not laid smoothly or adhesion was poor. Both can create stress points in the membrane, making it vulnerable to cracking.
- Ponding Water: Any area where water stands for more than 24-48 hours is considered ponding. This is a significant issue for BUR roofs, as prolonged exposure to standing water can accelerate the degradation of the bitumen, lead to moss or algae growth, and compromise the integrity of the membrane. It often indicates insufficient slope or blocked drainage.
- Open Joints at Seams: While BUR aims for a monolithic membrane, seams still exist where rolls of felt overlap. Over time, these joints can open up due to thermal expansion and contraction, allowing water to penetrate. We look for these during inspections and address them promptly.
If you spot any of these issues, it’s time to call a professional for roof repairs. Addressing these problems early can prevent them from escalating into major leaks or requiring a full roof replacement.
Best Practices for BUR Roof Maintenance
To ensure your built-up roof reaches its maximum potential lifespan and continues to protect your investment, a proactive approach to maintenance is key. Regular care can significantly extend its service life and prevent costly problems.
Here are our best practices for maintaining a BUR roof:
- Regular Inspections (at least twice a year): We recommend professional inspections at least twice a year, ideally in the spring and fall, to catch minor issues before they become major headaches. This includes checking for any signs of alligatoring, blistering, ridges, or open joints. After any severe weather event (heavy rain, hail, strong winds), an additional inspection is crucial.
- Keeping the Roof Clear of Debris: Leaves, branches, dirt, and other debris can accumulate on a flat roof, trapping moisture and accelerating degradation. Regular cleaning prevents this buildup and allows the roof to dry properly.
- Ensuring Drains and Scuppers Are Clear: Clogged drains and scuppers are a primary cause of ponding water. We ensure all drainage points are free of obstructions to allow water to flow freely off the roof.
- Applying a Protective Silicone Roof Coating Every 5-10 Years to Extend Life: A high-quality protective silicone roof coating can significantly extend the life of your BUR system. These coatings provide additional UV protection, improve reflectivity (reducing thermal stress), and add another layer of waterproofing. It is recommended that a protective coating be applied every five years to maintain peak performance, and can extend the roof’s lifespan by an additional 15-20 years.
- Scheduling Professional Roof Maintenance: While some tasks can be done by building staff, professional roof maintenance by experienced contractors is invaluable. We have the expertise to identify subtle signs of wear, perform specialized repairs, and apply protective coatings correctly, ensuring your roof receives the best possible care.
Professional Built-Up Roofing Installation in Berryville, AR
Choosing a local roofing contractor who understands the specific challenges of the Arkansas climate is crucial for the success of your built up roofing installation. From intense summer heat to heavy rain and storms, a local expert ensures your roof is built to last. For trusted craftsmanship in the Berryville area, look no further. Our 50 years of experience serving Northwest Arkansas means we’ve seen it all and know exactly what it takes to install a durable, long-lasting BUR system that stands up to our unique weather patterns.
Heritage Roofing & Repair
3458 Arkansas State Hwy 221, Berryville, AR 72616
(870) 654-1164
Frequently Asked Questions about Built-Up Roofing
We often get asked various questions about built-up roofing, and we’re always happy to provide clear, straightforward answers. Here are some of the most common ones:
How many layers are in a typical built-up roof?
A standard BUR system consists of multiple layers, typically ranging from three to five plies of reinforcing felt bonded with bitumen. The exact number of layers depends on the specific requirements for durability, warranty, and budget for the commercial building. More layers generally provide greater redundancy and a longer lifespan. For example, a five-ply system offers more protection than a three-ply system.
Can a built-up roof be installed over an existing roof?
In some cases, a BUR system can be installed over an existing roof in a process called a “recover.” However, this depends on local building codes and the condition of the current roof. The existing roof must be dry, stable, and properly prepared, with no signs of significant moisture or structural damage. A professional roofer should always perform a thorough inspection first to determine if a recover is feasible and safe. Often, codes limit recovers to one additional roof, and a structural engineer’s evaluation for loads may be recommended. If the existing roof is severely damaged or saturated, a full tear-off and replacement is usually the best, and sometimes only, option.
What causes blisters to form on a built-up roof?
Blisters are caused by trapped moisture or air between the layers of the roofing membrane. As the sun heats the roof, the trapped air or moisture expands, creating a bubble or blister on the surface. This is often a sign of improper adhesion during installation, where the bitumen did not fully bond the layers together, leaving small pockets. Blisters can also form from moisture trapped during construction or from condensation within the roof assembly. While minor blisters may not immediately compromise the roof, larger or broken blisters can allow water to enter the system, leading to more significant problems. Proper application techniques, ensuring complete adhesion, and a dry substrate are crucial to preventing blistering.
Conclusion: Trust the Experts for a Flawless BUR Installation
Built-up roofing remains one of the most reliable and durable options for commercial properties, offering unparalleled protection when installed correctly. Its multi-layer design creates a formidable barrier against the elements, ensuring your assets are safe and secure. However, the quality of the installation is paramount to achieving the system’s maximum lifespan and performance. The longevity and effectiveness of your BUR system depend heavily on meticulous preparation, precise application of materials, and adherence to industry best practices. This isn’t a DIY job; it’s a complex process that demands professional expertise and experience.
For a roof built with integrity and expertise, partner with experienced professionals. Our team at Heritage Roofing & Repair has over 50 years of trusted experience in built up roofing installation, ensuring dependable, affordable, and quality craftsmanship. If you’re considering a built-up roof for your property, contact the experts at Heritage Roofing & Repair to discuss your commercial roofing needs and get a free estimate. We’re here to protect your investment for decades to come.